


Input events
Input events https://help.heredis.com/wp-content/themes/corpus/images/empty/thumbnail.jpg 150 150 Heredis Help Knowledgebase https://help.heredis.com/wp-content/themes/corpus/images/empty/thumbnail.jpgIn the Personal Data tab, Heredis proposes a full list of events commonly encountered in genealogy: individual events and shared events which may apply to the couple formed by the primary person and the selected spouse.
Add a person event
Add a person event
- Click on the
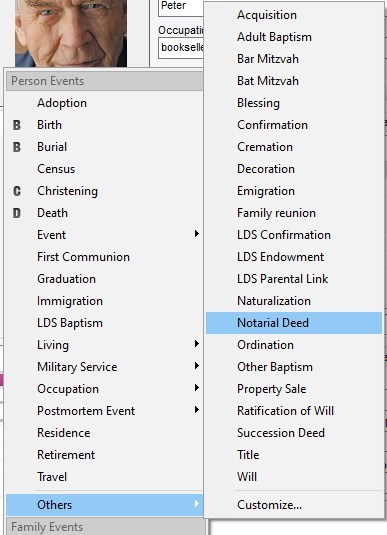
 button on the bar below the list of events. To facilitate the selection of the event, Heredis displays at the top of the list, the events already in use in your genealogy file, and finally the events not yet used in the Others group.
 - Select the desired event, for example, Will. Will is added to the list of events of the person.
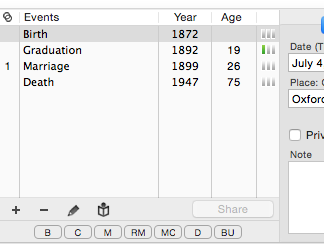
Info • You can also add major events by clicking the B, C, D or BU buttons (Birth – Christening – Death – Burial) placed below the events list. If these buttons are not visible, change the input mode of the screen.
Add a family event
- Select the spouse of the event from the list of families.
- Click the button on the bar below the list of events.
Info • You may also add the main events of the family by clicking the M, RM, MC buttons (Marriage – Religious Marriage – Marriage Contract) below the events list. If these buttons are not visible, check the display mode of the screen.
- Select the desired event, such as Engagement. Engagement is added to the list of events of the person.

Info • The family events also appear in the input and navigation screens of the spouse.
Heredis 2025 introduces 2 new event types:
- Notarial Deed, available as a person or union event,
- Succession Deed available as a person event.
Adding a Succession Deed event creates no inconsistencies, either for the person concerned or for the heirs with whom you can share the event.
If the event has never been used before, it can be found under Other.
If you can’t find the event you’re looking for, you can customize the events. See the article Create customized events not proposed by Heredis.
Share a person event
Heredis allows you to share a minor person event with other persons in your genealogy. This event and all information relating to it will be automatically available to all participants in the event.
Select a person event in the list of events displayed in the Personal Data screen > Person event and then click the ![]() button below this list. The Witnesses tab is replaced by the Participants tab and allows you to add the other persons sharing this event.
button below this list. The Witnesses tab is replaced by the Participants tab and allows you to add the other persons sharing this event.
It is possible no longer to share an event. With this operation, the event no longer to be shared remains associated with the primary person on the screen. Other participants become mere witnesses and the “unshared” event no longer appears in their list of events.
In the list of events for a person, the letter S, displayed in front of an event, indicates that this event is shared.
Info • the major person events Birth, Baptism, Union, Death and Burial are not shareable. The Domicile couple event is also shareable.
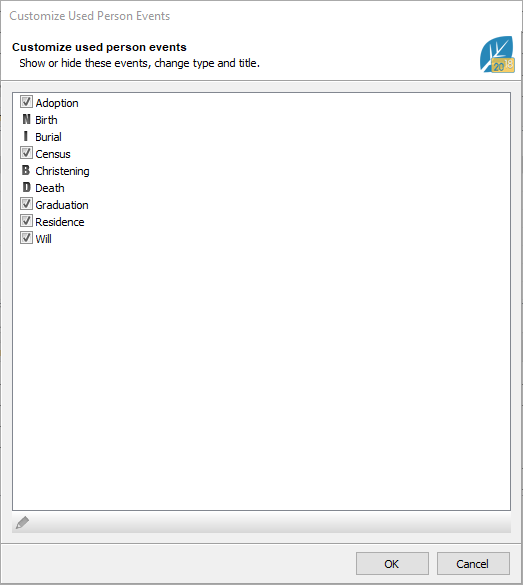
Customize the display of events
Heredis can present the list of available events according on your work habits. Thus, you will have easy access to the events that you create most often.
The customization affects only the list of events to create and there is no risk to your data, events already created remaining always displayed.
Modify the list of events displayed
1. Click the ![]() button on the Personal Data tab, in the events list.
button on the Personal Data tab, in the events list.
2. Choose Others > Customize…
3. Untick rare events, those which you rarely use, to lighten the list when creating a new event.
Windows Customize Event
Mac Customize Event
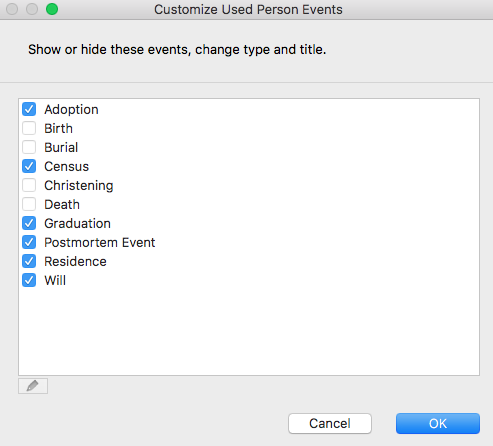
Heredis always shows events which you have already used at the top of the list, and events that you have not yet used at the bottom of the list. You see now that the other used events part no longer contains the items you have unticked.
You may always tick any new hidden events to make them reappear.
Information on the event
The detail of each selected event is available on the Personal Data tab. If you do not see all the events, change the display mode of the Personal Data tab by clicking on the cogwheel. See the article Customize Heredis for more details.
Information of the event
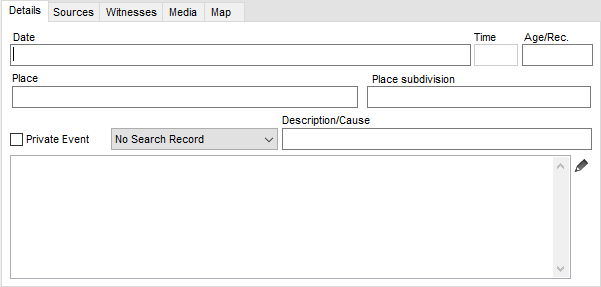
Date
To enter the date, numerous input options are available, whatever the period concerned, in four different types of calendars: Gregorian, Julian, Hebrew or French Republican. To enter a date in a specific calendar, precede the date of J for Julian or H for Hebrew (the latter is automatically recognized by Heredis since the name of the months is different).
See also Dates article for further details on Date format and calendars.
Time
Time may be specified as 05:30 or 5:30. To separate hours and minutes, you can type either : or H or h, with no spaces.
Age on record
Enter the age stated on the deed or record, if it is mentioned. You may specify the age with the words: years, months or days (or y, m, d). No other word will be accepted. An age with numbers only will be considered as years.
If the birth date of the primary person is known, you may compare the age on the deed with the actual age shown in the list of events.
If the date of birth is unknown, Heredis will automatically complete the field with an approximate date calculated from the age on record that you entered.
Place
Indicate the location where the event took place.
Entering a new place
1. Type the name of the city in the Place field, not bothering about upper or lower case. With the first letters, Heredis proposes a list of places that may match your entry.
2. Select a place using the mouse, or use the up and down arrow keys and confirm the location selected by pressing Enter.
3. If no proposed location matches, (Windows) fill in the case and click on the tab key to add this new place to the index; (Mac) select New Place in the list.
4. Complete the information on the new place to be recorded, and press OK. The new location will be added to the Places Index. You may geolocate this place. See the articles Places Index, Geolocating places and Heredis’ Preferences.
Assigning a place already in use in your genealogy
1. Unfold the Places panel.
2. Drag the place of the event and drop on the event being entered.
Info • Be sure to visit the place of your ancestor’s life by clicking the Map tab of the event.
Place Subdivision
The Place Subdivision field is to specify a more precise location than the city: the hamlet, parish, district or borough of a large city. Since Heredis 2020, you can geolocate the subdivision, see the details on Geolocating Place Subdivisions.
Cause/Information
The Cause/Information field allows you to specify the cause of the event (as for Death, Divorce, Professional transfer events) or any useful precision.
Event Note
Enter your comments about the event directly into the note field. To embellish the entered text, click the pencil icon. Heredis opens the note in a separate screen containing all the formatting tools. Tick the Private Note box to exclude the event note from exports or printed documents.
Other elements linked to the event
The Details tab of events displays a Private Event box. When this box is ticked, all data in the event may be excluded from exports or hidden in printouts.
Each event may be completed with witnesses, sources, media and an interactive map showing where the event took place. Each of these elements is available in a tab on the Event screen.
See also Add witnesses and participants, Sources, Media.
Click on the magnifying glass ![]() or
or ![]() or
or ![]() or
or ![]() to open the Search Data tab and complete the search status. (see the article Search Data tab of an event)
to open the Search Data tab and complete the search status. (see the article Search Data tab of an event)

Delete an event
Simply select the event to erase and click on the ![]() button at the bottom of the event list.
button at the bottom of the event list.
