


Descendants Wheel
Descendants Wheel https://help.heredis.com/wp-content/themes/corpus/images/empty/thumbnail.jpg 150 150 Heredis Help Knowledgebase https://help.heredis.com/wp-content/themes/corpus/images/empty/thumbnail.jpgThe Graphs tab allows you to display the Ancestors Wheel as well as the Descendants Wheel and mixed wheel. Its process is similar to the Ancestors Wheel.
Any change made in a person’s data entry form will automatically be reflected in the wheel.
Access the wheel by clicking on the Graphs tab > Descendants Wheel or from the button ![]() you can add to the toolbar.
you can add to the toolbar.
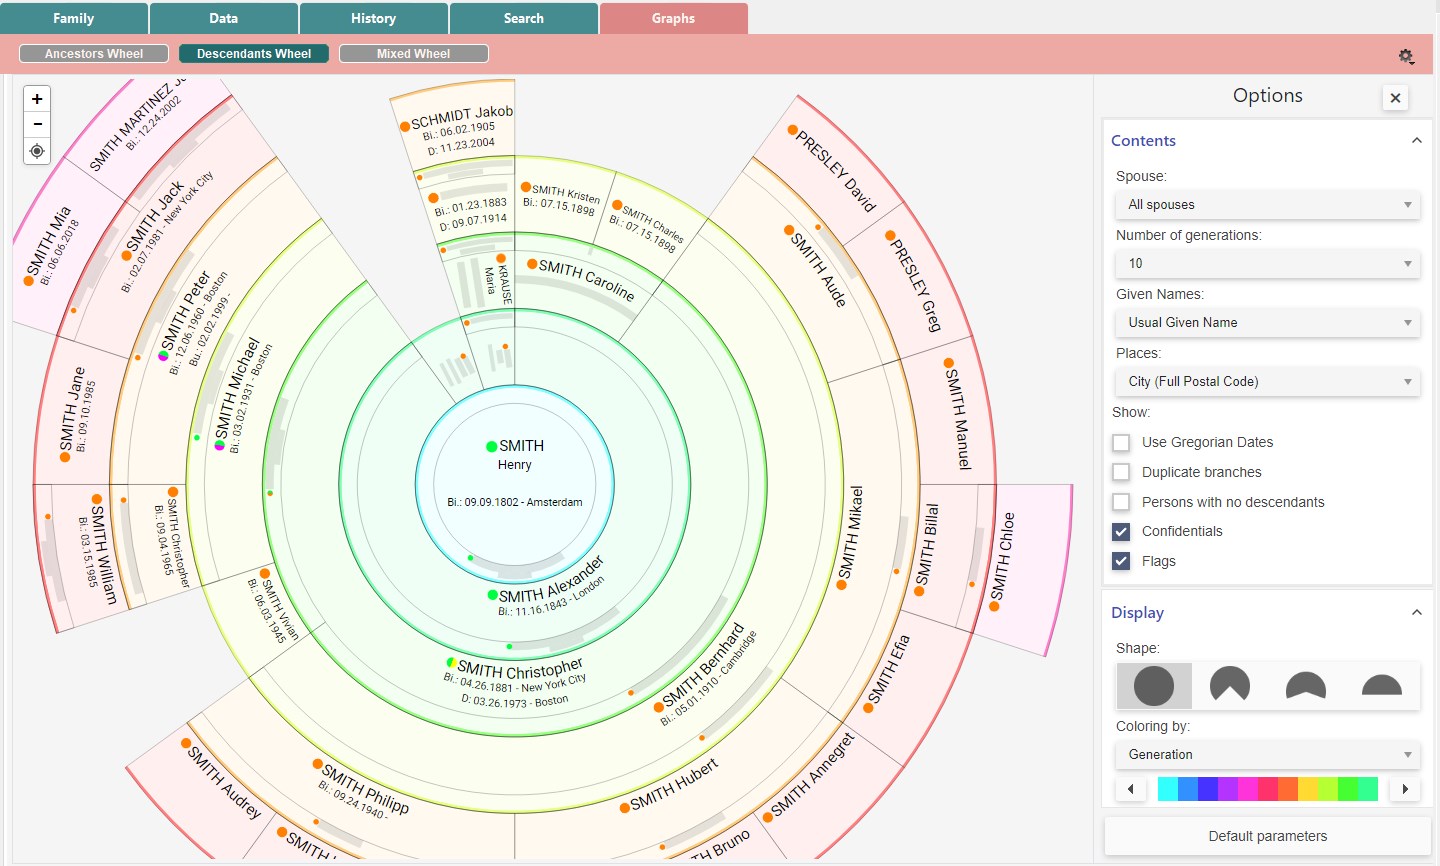
Navigate the Wheel
The same way you do it in the XXL Family window, you can zoom in and out by scrolling with your mouse wheel or using the ![]() and
and ![]() buttons in the upper left corner. Hold down the left click of your mouse to move the wheel around in the window.
buttons in the upper left corner. Hold down the left click of your mouse to move the wheel around in the window.
Click on the target ![]() button to re-center the wheel on the screen.
button to re-center the wheel on the screen.
Right-clicking with your mouse on a person’s box allows you to:
- View the person’s Relations
- Define him/her as the Primary Person
- Print the Person Sheet
- Define him/her as the Root Person
- Add the person to the Bookmarks
- Highlight the branch from this person
- Show all occurrences in case of an implex (“duplicate branches”).

To free up your screen, fold the Options palette by clicking the ![]() button; unfold it using the burger
button; unfold it using the burger ![]() button.
button.
Options
Content options
Spouses

If the primary person had several spouses, select one of the spouses to display only the descendants from that spouse.
If you select All spouses, then all descendants from the main person will be visible.
If the person has children from none of his/her spouses, a question mark will show the descendants born from an unknown parent.
Number of Generations

Click on scroll-down menu to specify the number of generations to generate. Between 4 and 12 generations from the Primary Person.
Given Names
Choose the Given Names format you like best by clicking on the drop-down menu.
- All Given Names,
- First Given Name,
- Usual Given Name
- First Given Name and Initials.
Places

Choose the format of the places shown in the boxes.
Dates in Gregorian format
We currently use the Gregorian calendar. Yet you may have already entered dates in another calendar format, such as the Republican calendar.
Check the Use Gregorian Dates box to convert Republican dates to Gregorian format so your family gets a better understanding of the graph.
Duplicate branches (aka “Implexes”)
It was not uncommon for cousins to marry each other. The wheel helps you identify duplicate branches created by such marriages.
Check the Duplicate branches box.
Words inside these boxes are then displayed in red.
Right-click on a person in the duplicate branch and choose to display all occurrences in order to locate them among the various branches in the wheel. You will see the boxes for this person stand out and thus better locate its multiple appearances in the wheel.
Persons with no descendants
If you have ticked the “Persons with no descendants” box (see Flags suggested by Heredis) in personal data tab, you can display the end of the branch by ticking the box. Childless will then be written in a box to indicate the end of the branch.

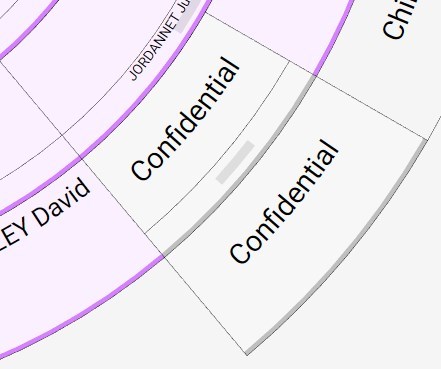
Confidential
Confidentials box allows you to choose whether or not to display persons declared confidential in the genealogy. If “Confidentials” is unchecked, confidential persons will appear with the word “Confidential” in their box (see Flags suggested by Heredis).
Flags
If you have set tags for the persons in your genealogy and you tick the box, the persons present will be marked with the flag(s) icon(s).
Display Options
Shape

You can choose from a variety of shapes for your wheel. A full wheel or a fan wheel with various angles. Click on the shape that suits you best.
Filters
Depending on the filter selected, the wheel will display different colors.
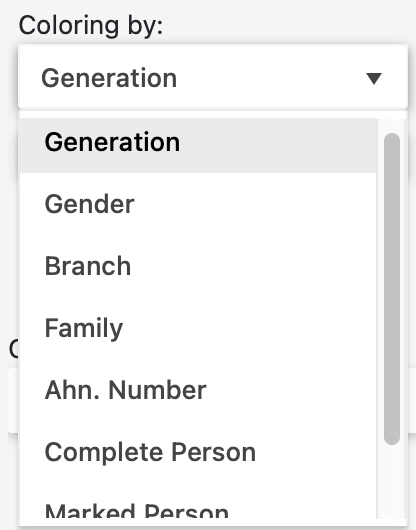
The various filters offer coloring by:
- Generation. Each generation will have its own color.
- Gender. Men and women will be highlighted in two different colors.
- Branch. Each child of the primary person and his descendants has a different color.
- Family. If primary person has more than one spouse. You can change the character’s spouse in the spouse list filter.
- Ahn. Number. Display clearly which persons of the wheel belong to the Ahnentafel line.
- Person declared as Complete. This coloring option gives you an opportunity to visualize the persons whose conditions of completeness for major life events are met. See Heredis’ Preferences > Completeness of data.
- Marked Person. If you have marked persons based on one or more criteria, they can be assigned a different color than those unmarked. E.g., if you want to identify all persons born in the same city. See Flags suggested by Heredis and Smart Search for information on how to tag or “mark” persons.
- Place: see Location wheels article.
- None. No wheel coloring at all.
You can change the color gradient by clicking on the arrows and holding the left mouse click on the color strip and dragging it; or by holding the slider with the left mouse click and dragging it. Depending on the filter you choose, you will be offered several color sliders.
Once you have reached the chosen color, you can release the mouse click. The wheel will change colors, applying your selection.
Coloring by Generation filter with arrows

Coloring by Gender filter with arrows

Return to default settings
To return to the default settings (6 Generations, coloring by generation, 360° wheel shape, without empty boxes and implexes, without parents not found with confidentials and with date calendar entered), click on the Default Settings button.
Export before printing
See the article Export a personal or family timeline or wheel for printing.