


(Windows) Unlimited size tree chart : ancestors, descendant and hourglass
(Windows) Unlimited size tree chart : ancestors, descendant and hourglass https://help.heredis.com/wp-content/themes/corpus/images/empty/thumbnail.jpg 150 150 Heredis Help Knowledgebase https://help.heredis.com/wp-content/themes/corpus/images/empty/thumbnail.jpgYou can create as many graphical representations of your genealogy as you wish. A tree chart may be saved with the data it contains and its layout. It can then be reopened, modified in its presentation, printed again. It has become independent of the Heredis data file.
Choose from the different types of tree charts proposed in the Charts menu or click Charts ![]() on the toolbar to visually select the tree charts proposed by Heredis.
on the toolbar to visually select the tree charts proposed by Heredis.
Edit a tree chart
The printing of a tree chart takes as its starting point the primary person displayed and will display his/her ancestors, descendants or both as an hourglass tree chart.
Choice of tree chart
In the Charts menu or in the displayed selection screen, choose the type of tree to build from the list to the right.
Choose a tree chart

Heredis proposes various types of tree charts of unlimited size. Whatever the type of tree chart selected, you can print it or have it printed over several pages or a single long strip of paper.
When a tree exceeds the size of your printer, each page is printed with an overlap to facilitate mounting of the chart.
Choice of theme
Choose a theme

Click a theme in the viewer. To facilitate your choice, Heredis displays an overall preview of the tree to be edited with this theme or a preview of a box. Scroll through the different themes by pressing the arrow keys or with the mouse. The last used themes are preset for each type of tree chart. After testing the different themes of tree charts, you may define your favorite themes. Click the Add to Favorite ![]() button and the theme is marked with a heart icon that allows it to be recognized.
button and the theme is marked with a heart icon that allows it to be recognized.
Info • You have a search filter for favorite themes. Thus, you can display only the themes that you commonly use.
Chart Settings
Specify the construction parameters that suit you for the selected theme: number of generations, people to be displayed or not on the tree chart.
1. Indicate the number of generations. It is unlimited for ancestors as well as descendants.
Unlimited Chart

If this option is available, specify who will be automatically included or not in the tree. Check or uncheck the box to print marked persons. Check or uncheck the box to print confidential persons. If you choose to print them, you will need to specify how they will be displayed (in full or blur). See the article The different data fields to know everything about this marking.
2. Choose the orientation of the tree chart, building from bottom to top, from left to right or from right to left.
Choose Orientation & Layout
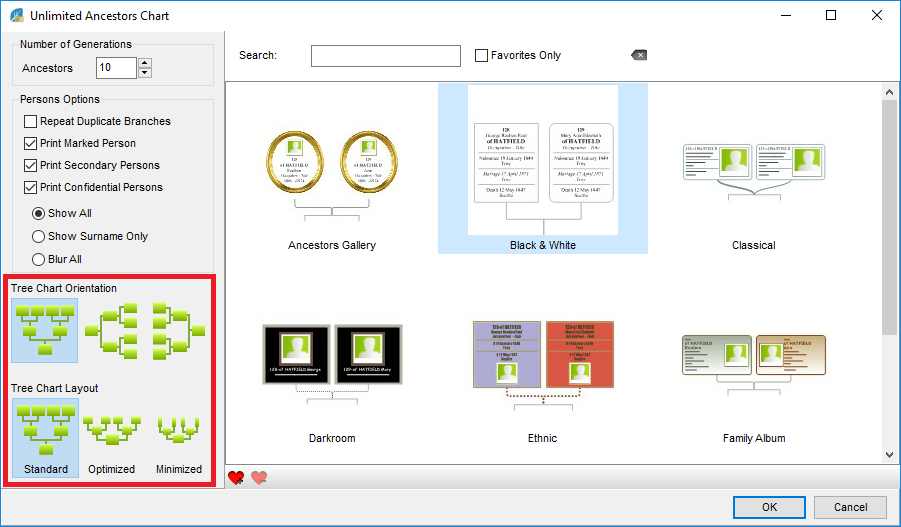
3. Choose a method for automatic construction according to the space you want to allocate to the tree chart.
• The Default tree chart is built with all boxes of the same size, that is to say that the box of the central character has the same size as that of persons shown in the third generation or 10th generation. In this tree chart, generations will be located one above the other without overlapping.
• In the Optimized tree chart, boxes gradually decrease in size with the higher generations and they slightly overlap.
• In the Minimized tree chart, the boxes will diminish in size and content and their position can be rotated at the end of the branch to save even more room.
4. Select the persons for inclusion on the tree chart. By default all persons appearing in the ancestry or descent of the primary person are displayed on the tree chart. You may untick secondary persons, or marked and confidential persons, for them not to be displayed on the tree chart. You may also hide all the data you have declared to be private (events, pictures, etc.).
Click OK to start the construction of the tree chart according to the theme selected and with the chosen parameters.
Tree Chart Screen
Heredis displays a tree chart representing the lineage of the primary person and which is printable immediately. If you want to make changes to the tree chart, you have tools in the specific Tools panels of the various tree charts.
Toolbars and menus
When the tree chart is displayed, the menus and buttons are different from those for data management. You may use the buttons for normal actions: ![]() Save,
Save, ![]() Pages,
Pages, ![]() Add,
Add, ![]() Layout,
Layout, ![]() Print. Display only the buttons you use most often by choosing Windows > Customize Toolbar.
Print. Display only the buttons you use most often by choosing Windows > Customize Toolbar.

Use the tree chart menus to manage also the layout of the screen or the selection of people on the tree chart.
Info • You can open another previously saved tree chart while the tree chart is already open on the screen choose File > Open.
Persons displayed in the tree chart
The Search panel of the tree chart contains a list of all persons included in the chart. Clicking a person in the list previews that person’s box in the tree chart. A double click navigates through the tree, if its size exceeds that of the screen, to display the box for a selected person.
To quickly find a person in the list of individuals on the tree chart, enter the surname or given name. Refine the search by selecting from the drop-down menu, the gender of the person sought if the name is multiple.
When there are marriages between blood relations (implex) on your tree chart, certain ancestors may be included more than once. By default, Heredis will only display one complete branch and duplicate branches are cut off. If you want to repeat the implex branches, tick the option in the settings screen of the tree chart prior to construction.
Click the name of the ancestor in the Search panel and Heredis displays the various positions of the person in the tree chart. Click on the first position to see the entire branch displayed. The different boxes for the ancestor have identical lettering.
Info • In Search panel of the tree chart, click the name of a person in the list, his/her summary appears in the Summary panel.
Preview of the selected box
The Tools panels displays the selected box. At the opening of the tree chart, Heredis displays a complete view of the document, whatever its size. The preview is very useful in large tree charts, when the content of the boxes is not readable on the screen. This visualization immediately displays any changes that you apply to the box.
For more details, see the article (Windows Pro) Apply a selection to a tree chart
Tree chart formatting
You may modify the unlimited tree charts to give them a more personal graphical appearance. In the fixed size tree charts, the changes apply only to the content of the boxes. The overall environment is not editable.
The different Tools panels allow either changes to be applied to the whole tree chart or changes to a given selection (one or more boxes).
Display screen
The central area of the screen shows all the boxes of the tree chart, the title of the tree and any images that you have added.
To help you check and estimate the size of your tree chart, materialize the pages on the screen.
In the toolbar, click Pages > Show/Hide Page Breaks ![]() or in the menu choose Display> Show/Hide Page Breaks.
or in the menu choose Display> Show/Hide Page Breaks.
The number of pages depends on the chosen page format for your printer. To change the format and page orientation in your printer, click the Page Setup button in the Print panel.
To move around the tree chart, use the horizontal and vertical bars, or change the zoom factor or double-click the name of a person from the Persons panel to display his/her box directly.
Zoom
You can increase (zoom in) or reduce (zoom out) the display of the tree chart. It is often necessary to reduce the display of a tree chart to visualize all required generations. Choose Display > Zoom > Increase Magnification or Decrease Magnification. To return to the actual size of the tree, choose Display > Zoom > 100 %.
You may also select different levels of zoom on the bottom bar of the tree chart screen.
• Click the arrow and select a value from the drop-down menu or use the slider to change the zoom level. Heredis indicates the factor used to reduce or enlarge to the left of the bar.
• Click the 100% button to return to the real size of the tree.
• Hold down the Alt key. With a left click, the tree chart grows, with a right click, the tree chart is reduced. You may also use the mouse wheel up or down to enlarge or reduce.
Info • Remember to fold back the Search and/or Tools panels to have the maximum available space for display of the tree chart.
Selection
Before making changes to a tree chart, first select the boxes to which they will apply. Depending on the type of change to be made, make individual selections or selections of a genealogical order.
• To select all boxes of the tree chart, choose Select > Select All. From anywhere in the tree chart, you can right-click the mouse and choose Select All.
• To select one or more boxes of the tree chart, drag the mouse cursor over the boxes to be selected.
• To select more boxes that are not contiguous, select the first box, and then, holding down the Shift key, the additional box or boxes To make genealogical selections from any box in the tree, right-click the mouse and choose Select Men Only (or Women Only, or Person and All Ancestors, or Person and All Descendants or Generation).
Info • Persons corresponding to the selected boxes are also selected in the Search panels.
For more details, see the article (Windows) Finding your way around a tree
Format the tree chart
To make changes, use the tools in the tree chart Tools panels. To go further in the formatting of the boxes, make your changes in the Layout panel.
Layout Panel

Modify the contents of selected boxes
• Choose the content formats that suit you for surnames, given names, dates, places and genealogical headings from the drop-down menus.
• Tick the Show Ahn./User Number and Show Preferred Picture boxes to add this information, if it exists, in the selected boxes.
Change the text formatting
Without delay, change the font, size, color and text alignment with the drop-down menu, the cursor and the buttons of the Layout panel.
Info • Do not forget that you can make a selection of all men in the tree chart, then all women, to apply different text colors. For this, use the Select menu or right-click of the mouse.
Hourglass Chart

Change the layout of the tree
1. In the Layout panel, change the spacing between boxes or the spacing between generations by clicking the arrow buttons.
2. Tick the Display Empty Lines box for all boxes to be filled with the same number of lines, even if you do not have information.
3. Click the Pages > Center Tree Chart button to reposition it optimally after modifications.
Move elements in the tree chart. After selecting boxes, several methods for moving them are available. Choose the one that suits you best
• Mouse: Drag the selection to its destination by holding the mouse button pressed.
Info • Hold down the Shift key to prevent any movement off the generation axis. Each box moved will remain aligned with the other boxes in the same generation.
• Arrow keys: press the arrow keys to move to the position you wish to select.
To cancel the moving of the selection, press Ctrl-Z or choose Edit > Undo. To restore the move, press Shift-Ctrl-Z or choose Edit > Redo.
Change the design of the tree chart
Change the graphical appearance of your tree charts with a few clicks. Some graphical changes apply to the whole tree chart, others apply only to the boxes you selected.
1. Select the boxes to be modified or choose Select > Select All.
2. In the Layout panel, change the overall font, size, alignment and text color.
3. The display of boxes on the tree chart is defined by three elements: box styles, content types and connecting line styles. The different themes that come with Heredis contain several presets for each of these elements. They are available in the Tools > Layout panel of the tree chart.
- Choose a preset to be applied to the selected boxes in the dropdown menus A preview screen shows you the appearance of available presets.

- You can change each preset of box styles, contents or connecting lines. Click the Layout button in the toolbar, use the right-click menu on the selected box, or click the Edit… box shown as a pencil to the right of each menu to access all the changes.
Info • By clicking on the pencil, you open the setup screen of the preset. To change the presets of box style, contents and connecting lines at the same time, click the Layout button.
- The box preview contains a tick box in the top left of the preset edit screen, for applying a modification to the males and females simultaneously.
Change the box style
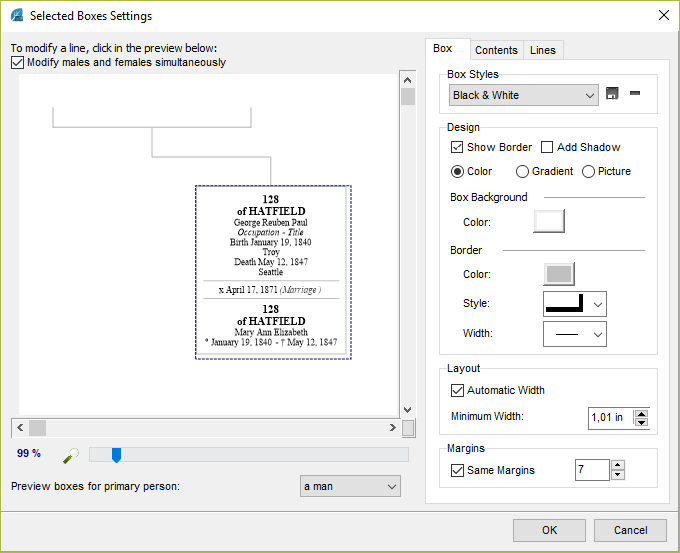
Change the Box style preset displayed or choose a different preset from the Box Styles drop-down menu to form a base for your custom formatting.
1. Click the border of the box to change border, shading, box background, orientation and size of the box including padding.
2. Click on an item, eg. name, to access the formatting of this item. When a line contains two distinct elements, they may be changed independently of one another, for example Surname – Given Name or Date – Place.
3. Click on the picture to determine its size, its border and its eventual position in the box.
Info • One can only change the borders of the drawn boxes If you choose an image for the box background, the outline must be included in the image.
All changes are immediately displayed in the preview of the box.
Info • To see better the changes made in the preview box, use the zoom slider at the bottom of the window or click the magnifying glass icon and choose a zoom percentage.
Click OK to apply the changes to all selected boxes on the tree chart.
Modify the content
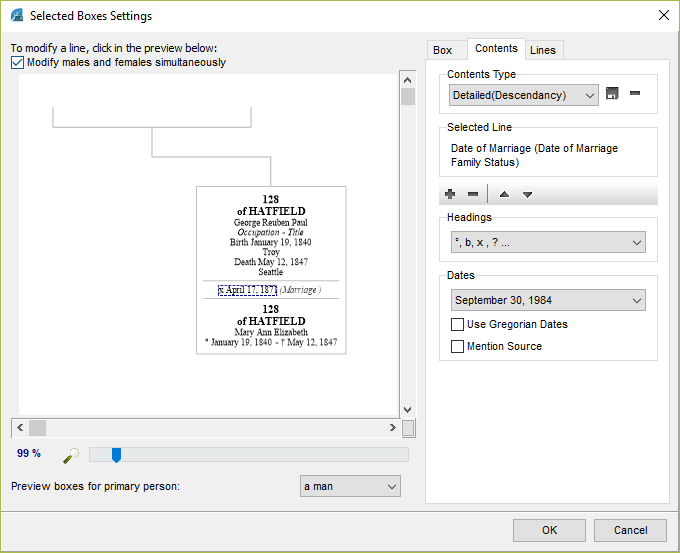
Change the Content type preset displayed or choose a different preset from the drop-down menu as a base for your custom formatting.
Click on each item displayed in the box to change the data formats. For example, click the name to indicate management of the particle, whether to include the prefix and suffix of the name. Click on a date to indicate the desired format (long, short, in numbers or letters, etc.).
Info • One can materialize the presence of a source for each event mentioned in the boxes. Select the date field and tick the Mention source box to add the symbol (s) following the dates shown.
Click OK to apply the modified contents of the selected boxes on the tree chart.
Modify connecting lines
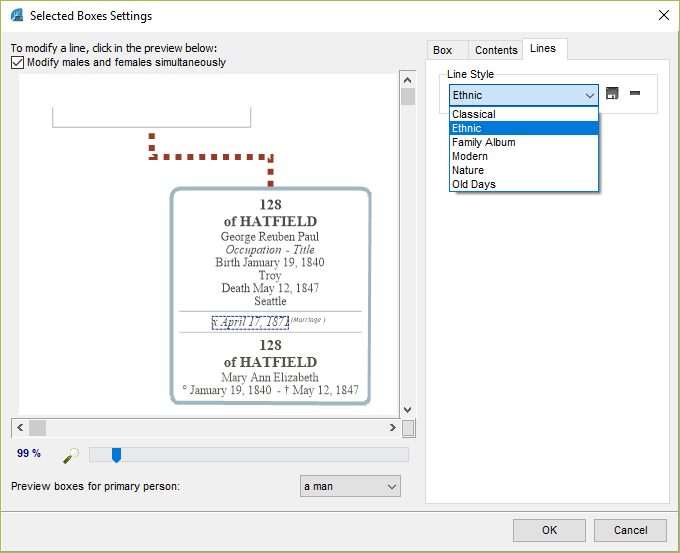
Modify the Line style preset displayed or choose a different preset from the drop-down menu as a base for your custom formatting.
1. Click the border of the box or on the connecting line to display the Line tab.
2. Choose the type of line to connect the selected boxes from the dropdown menu: right angles, rounded corners or curves.
3. Specify the width of the connecting line with the cursor and click the color box to choose a color.
Click OK to apply the modified lines to the selected boxes.
Edit the text of a box
1. Right click on the box to be edited and choose Edit Text to open the editing field.
Info • You can only edit one box at a time.
2. Enter changes to the displayed text.
3. Click OK to apply changes.
Edit the tree chart title
The tree chart title is a modifiable text zone.
Heredis proposes a title containing the name of the primary person. Double-click the title to open the text editor and make the necessary content changes and formatting of the text.
Add a Picture
Select the Edit > Add Picture menu or click the Add ![]() button on the toolbar to add a graphic illustration to your tree chart.
button on the toolbar to add a graphic illustration to your tree chart.
The picture is added at the top left of the tree chart displayed
- It is possible to add several pictures. If they must overlap, there are options for stacking images. Right-click the image to move the selected image forward, backward or to the background if it is a background image for the tree chart. Whatever option chosen, the boxes of the tree chart remain in the foreground
- When the picture is enlarged or reduced manually with the mouse, it is possible to restore the proportion between the picture and its frame by using the right-click Resize Image Proportionally option.
- The right-click Resize Image to Fit Frame and Default Picture Size options allow to resize the image in its display area.
- The image is an object that can be formatted. Click the
 button on the toolbar or select Modify Properties from the right-click menu on the image. Only box style changes are possible As with the tree chart boxes, you have available presets applicable to the surround of the image.
You can also consult our articles (Windows) Print or export as PDF a tree chart, (Windows) Save a tree chart.
