


Import a GEDCOM 5.5.1 into an existing file
Import a GEDCOM 5.5.1 into an existing file https://help.heredis.com/wp-content/themes/corpus/images/empty/thumbnail.jpg 150 150 Heredis Help Knowledgebase https://help.heredis.com/wp-content/themes/corpus/images/empty/thumbnail.jpgWarning: Any import into an existing file changes its structure. Consider before this type of operation to save a copy of your original file if necessary or back up the modified file under another name.
Importing a GEDCOM requires taking its time, don’t validate too fast, you won’t be able to make any changes after the import.
(Windows) Importing a GEDCOM
From the file in which you want to import the GEDCOM file.
- Launch Heredis.
- Open your genealogy file.
- Choose File > Import > GEDCOM file.
A message will warn you that the process is irreversible; if you have not created a backup, we advise you to click on No and to create one beforehand.
- Select the file (it must carry a .ged extension to be recognized by Heredis), then click Open.
- Select it and click Open.
- Choose whether or not to import media and sources, and how to handle quote names.
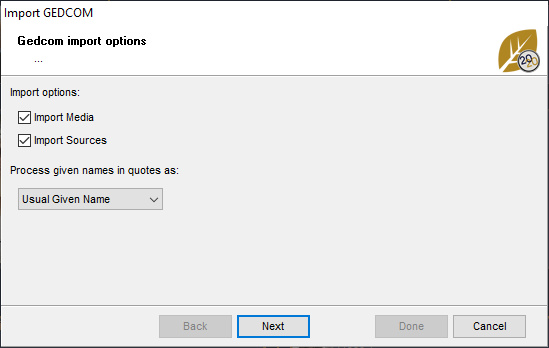
- Click Next
- You will probably have to check the places, not all software manages them in the same way. If you see a window like the one below, check the locations. Click Select appropriate places elements if the order does not match the data correctly. Click on the title of the column on the left to change the categories. (Example: below, the line Postal Code should be County)
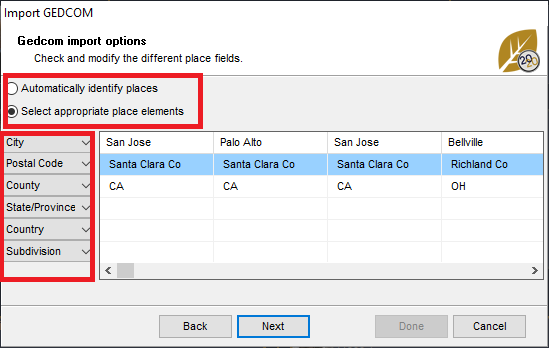
- Once the places have been listed correctly, click Next.
Each software has its own way of managing certain data in the GEDCOM format. So there are Owner Tags that may be unknown to Heredis (see article What is a GEDCOM? and GEDCOM tags generated by Heredis for more details).
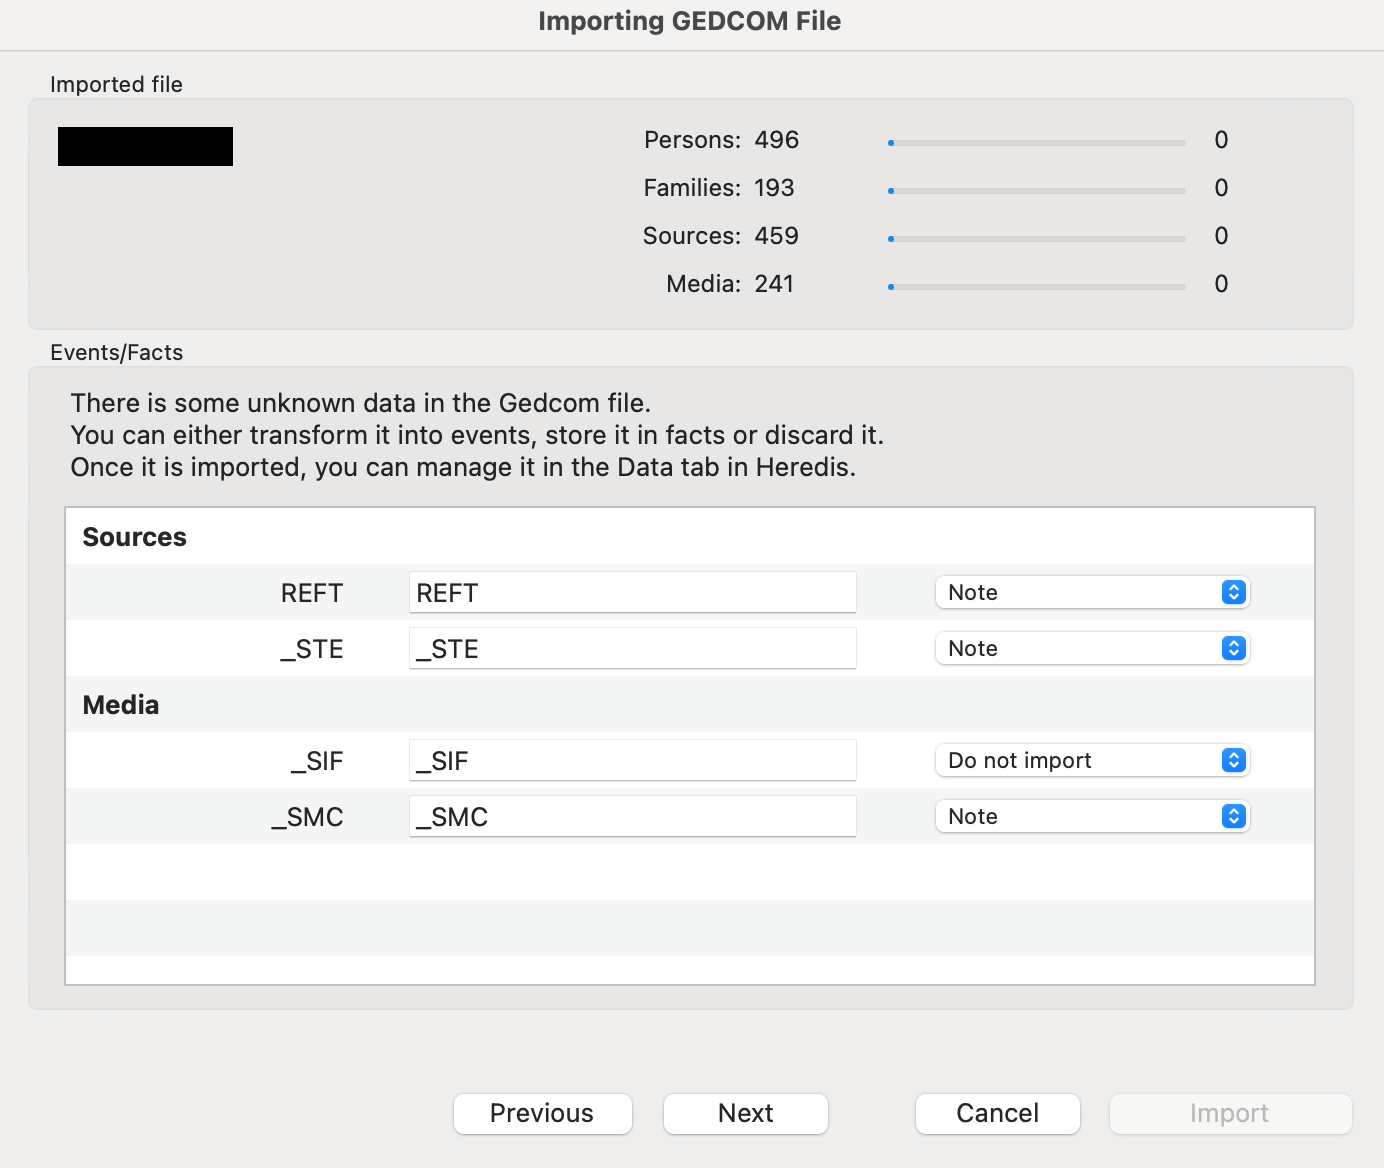
If Heredis does not understand a tag, then a window will open and ask you to handle this information yourself.
It will not be easy to modify it once the file is opened! Hence the importance to take the time to go through this process carefully.
You can choose whether or not to import unknown elements (tags). Heredis informs you of the type of data, e.g. whether it is a Source or Media item, etc.
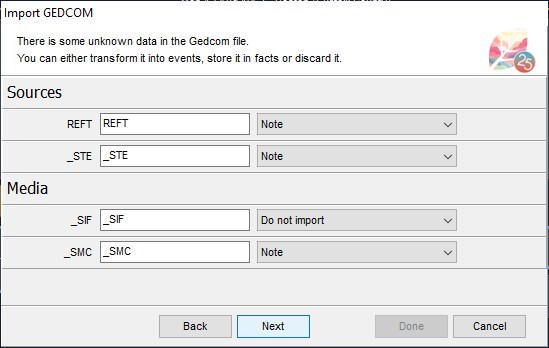
If you know the type of data indicated, click in the white box and modify the tag by indicating the title.
For example, you know that the REFT tag used by the software that created the GEDCOM corresponds to the document type. Click in the white box, delete REFT and indicate Type.
Click on the drop-down list and choose the location where you wish to see this element: Document.
If you don’t know the data type, choose Do not import to avoid polluting your file with unknown elements.
Consult the user’s manual of the software that created the GEDCOM file to figure out what the “unidentified” tags refer to.
- Once the tags are taken care of, click Next.
- Check the Assign a new source to box and choose which data to add that source to you. Fill the fields out of the source if you want to assign one. By adding a common source to all the information from this GEDCOM, you’ll know where you get your information from.
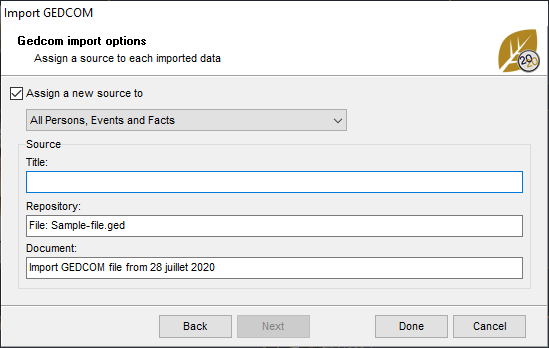
- Click Done to validate the import with the settings you’ve indicated.
- After the GEDCOM data is imported, it is necessary to create the links that will link the imported persons to those that were already present in the main file. To do this, use the
 Add features.
A GEDCOM never contains media because it is a text file format. On the other hand, the path and the name of the media are kept, so you can reintegrate them through the media index (if their name has not changed, Heredis will quickly reintegrate all of your media in a few clicks). See the article Media > Searching Media for more details.
(Mac) Importing a GEDCOM
From the file in which you want to import the GEDCOM file.
- Launch Heredis.
- Open your genealogy file.
- Choose File > Import > GEDCOM file.
A message will warn you that the process is irreversible; if you have not created a backup, we advise you to click on No and to create one beforehand.
- Select the file (it must carry a .ged extension to be recognized by Heredis), then click Open.
- Select it and click Open.
- You will probably have to check the places, not all software manages them in the same way. Click Select Appropriate Place Elements if the order does not match the data correctly. Click on the header of the column to be changed to change the categories. (Example: below, the line Postal Code should be County)

Each software has its own way of managing certain data in the GEDCOM format. So there are Owner Tags that may be unknown to Heredis (see article What is a GEDCOM? and GEDCOM tags generated by Heredis for more details).
If Heredis does not understand a tag, then a window will open and ask you to handle this information yourself.
It will not be easy to modify it once the file is opened! Hence the importance to take the time to go through this process carefully.
You can choose whether or not to import unknown elements (tags). Heredis informs you of the type of data, e.g. whether it is a Source or Media item, etc.
If you know the type of data indicated, click in the white box and modify the tag by indicating the title.
For example, you know that the REFT tag used by the software that created the GEDCOM corresponds to the document type. Click in the white box, delete REFT and indicate Type.
Click on the drop-down list and choose the location where you wish to see this element: Document.
If you don’t know the data type, choose Do not import to avoid polluting your file with unknown elements.
Consult the user’s manual of the software that created the GEDCOM file to figure out what the “unidentified” tags refer to.
- Once the tags are taken care of, click Next.
- Choose whether or not to import media and sources, and how to handle quote names.
- Check the Associate a Common Source box and choose which data to add that source to you. Fill the fields out of the source if you want to assign one. By adding a common source to all the information from this GEDCOM, you’ll know where you get your information from.
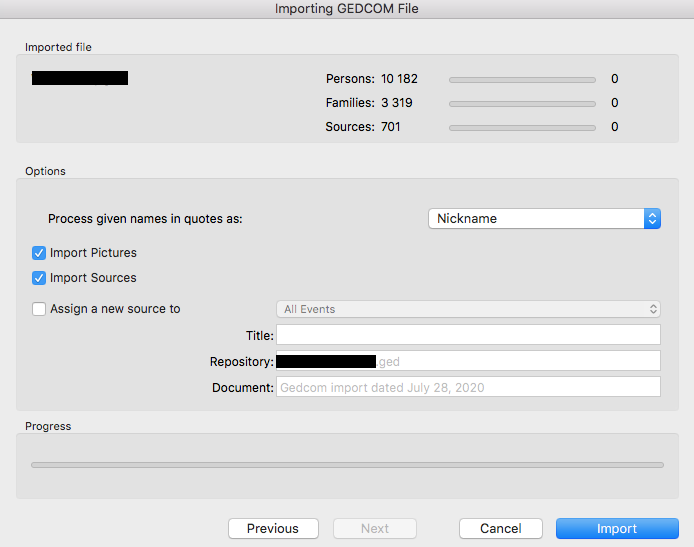
- Click Launch import to start importing. This may take more or less time depending on the size of the file to be imported.
- After the GEDCOM data is imported, it is necessary to create the links that will link the imported persons to those that were already present in the main file. To do this, use the Add features.
A GEDCOM never contains media because it is a text file format. On the other hand, the path and the name of the media are retained, so you can reintegrate them through the media index (if their name has not changed, Heredis will quickly reintegrate all of your media in a few clicks). See the article Media > Searching Media for more details.
You will then need to link the persons in your file to those in the imported file. You should also check for duplicates. See also (Windows) Permanent control for duplicates, (Mac) Permanent control for duplicates and Merging Two Persons.